 |
| Picture from thefashionbombdaily.com |
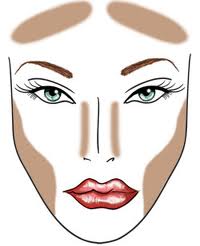
I had a really hard time finding photos where the contouring/not contouring was obvious with a flash, but hopefully these two show the difference. The effect is most noticeable under the cheekbone and along the side of the nose.
 |
| Before contoured cheeks |
 |
| After contouring and highlighting. |
To find the best bronzer for your face, look for a matte color that is two shades darker than your skin, and one shade darker if you have a very fair complexion. If you have a warm undertone to your skin, go with a gold-toned bronzer. If you have a cool undertone, find something that looks like it has a pinkish base.
To contour, you're first going to look at yourself in the mirror and press the insides of your cheeks to your teeth, making a "kissy face."
 |
| Angle Blush Brush |
 |
| Kabuki brush |
If you're using a liquid with a wand applicator (like Benefit High Beam), brush small dots of highlighter along your cheekbones, and blend in an upward circular motion with the pad of your thumb, then add very small dots of highlighter to the bridge of your nose and the cupid's bow and blend.
If you have oily skin or want to avoid a summer makeup meltdown, stick to a powder illuminator or shimmery nude eyeshadow. My current favorite highlighter is Physician's Formula Mineral Glow Pearls Powder Palette. It's great on it's own for a natural glow, or for setting liquid highlighters for a dewy finish. When I apply a shimmer powder or blush, I like to use a stippling brush with synthetic bristles, because it deposits the color lightly and slightly pixelates it, giving a more airbrushed effect. Brush the powder over your cheekbones, down your nose, and on the center of your forehead.
I hope you found this helpful! Stay beautiful!

No comments:
Post a Comment